Saturday, March 31, 2012

Let's Get This (Planting) Party Started!

As I detailed in this post, I have an enthusiastic,
but not green thumb.
However, I try to learn from my mistakes,
and wanted to try once more to fill my garden with edibles.

I was going to do what I had done last year -- attach a fluorescent shop light
to two sawhorses,

and then...

via Pinterest...

I saw this:


It's... it's... BEAUTIFUL.  And simple.  And space saving.

I HAD TO DO IT.

It was easy-peasy, lemon-squeezy to put together wire shelves, attach lights,
and set the whole thing up in the Girl's unused bedroom.  (She's away at college.)

Then, it was time for the fun part:

starting the seeds!

I had... a few...


So I gathered my containers:


my potting soil:


... and got planting!

Last year, I had a lot of success with yogurt containers.


I started a bunch of tomato plants and basil plants in them, and they worked out well.

The only problem is, they're round, and so they don't fit as nicely in 
the cardboard cat food trays as I would like.
So this year, I thought I'd try something else, too.

I had a LOT of rectangular feta cheese containers:


I put seeds at both ends, so I figure I could get at least two plants out of each container.

Do you know what I didn't put in either of these containers, though?

HOLES.

Yup, I'm livin' on the edge.  I've never over-watered a plant,
but I've certainly lost them to under-watering. I just put nice, moist potting soil
in the containers, and water them when the top dries out.  It worked pretty well last year.

Left over from last year were these peat pots I bought and didn't have much success with.


I think I tried... carrots? in them last year?  But they didn't work.  They kept drying out.
This year, I'm placing them in an empty plastic container, to keep them moister.
Also, I used them for the zucchini seeds.  I guess zucchini is supposed to be direct-sown,
but since my gardening area isn't ready yet, I figured this would be the next best thing.

Something cool I'm trying this year is this:


It's this nifty little wooden gadget that makes newspaper pots to start seedlings.
I got it for the Girl off of Etsy last year, but sadly the buyer is no longer there.
You can find more of them on the Wide Wide World of Web, though.


ETA:  Check out my next post to see how these newspaper pots are faring.

Last year, the Girl and I tried these on a sunny windowsill and outside, but they didn't work.
I'm hoping that cramming them all together inside under the lights will keep them moist
and ready to grow:


What's the plan when these get bigger?

I'll transplant some, use the plastic containers that I used for the zucchini peat pots for others, and I'll also use these:


 They're free, and a great size for the tomato plants!

Btw, what didn't I use?

Egg cartons:


I tried those last year, with no success.  Maybe they'd work better inside,
but there's about a tablespoon of potting soil in each cup!
They dry out so quickly!  The poster did fine, so, y'know, it could just be me.


There you go.  Wish me luck with my new plantings!


Saturday, March 24, 2012

Bringing Something New To The Party

I've seen a gazillion posts on Pinterest on how to DIY screenprinting.

Some people use the actual screenprinting materials, but in a little frame.


Others, use contact paper as the "resist."

I put all those ideas in a blender, and came up with this:


I use some screenprinting paint I had, a screenprinting squeegie,
contact paper for the resist, sheer "curtain" fabric off the big bolts at Joann's, and my

The beauty of using the Q-Snap is that I could get the fabric really nice and taut,
and when I was done, I could take out the fabric and do another design.
I didn't have to worry about storing a bunch of frames.

Also, my Q-Snap is huuuuge -- a full 16 inches across.
I could do some really big images with it.

The results?


Matching screenprinted t-shirts for the midnight showing of Hunger Games!


Wednesday, March 21, 2012

Figure It Out ONCE

It's spring break, so what does that mean?

Long days at the beach?

Mornings with tea and a book?

Afternoons at the mall?

Nope, it's...

HOME RENOVATION TIME!

The guy who flipped our house before we bought it, bless his heart,
evidently dealt with a hoarder-type situation. 
I appreciate the mountains of STUFF he cleared out,
but what I DON'T appreciate is that he used the cheapest materials to spiff up the place.

So slowly and methodically, room by room,
I've been using my Etsy money to brighten and liven the house.

I keep cost down by either doing the labor myself or
with the help of my amateur labor force, the Boy...


(It's handy having someone tall enough to get the top of the walls, without a stepladder.)

... and the Girl:


(Here she is, post - "Pi-VOT!" moment with the Boy's bed.)

Speaking of the Boy...this break, it was time to tackle his room:


Ugh.  Look at that sad carpet, those dirty white walls.  
It's not his fault:  like I said, the paint and carpeting were cheap, cheap, cheap,
so it doesn't clean easily.

But, look!


What a pretty color for the walls!  What a lovely, clean-looking laminate floor!

The Boy emptied most of his room in one day,
and the next the Girl and I took up the carpet, painted the walls,
and re-floored with a nice vinyl laminate.
(I'm not getting paid by the Allure people; I just really like their stuff.)

And what was the handiest tool for this renovation?

THIS BOOK:


Since my renovations are spread out,
I don't always remember details from each one.

So a few projects back I began this composition book.  Each renovation has an entry,
and each entry has very specific notes on what I learned.

For example, I had noted that old spools are perfect for painting baseboards.


 Unfortunately, I hadn't written down that the heavy tile scraper
was the way to remove those awful carpet nail strips, and I didn't remember
until after I'd slowly hacked and splintered a few with a screwdriver and chisel.


But I've made a note in my journal, so next time I'll be slicing away at those strips
from the very beginning!


Monday, March 19, 2012

Dig This Crazy Hep Cat

A couple years ago, I made some Christmas bunting for my Etsy store that I thought was
HI-LAR-I-OUS:


Get it?  Because at Christmas, sometimes you're Merry
but sometimes you're just Meh.

However, the buying public at Etsy wasn't as interested, and I think I sold a whopping...

...zero.

But, yay!  Someone contacted me for a custom string of this bunting,
with an interesting idea.
Instead of Christmas bunting, she wanted something anime/chibi.
We agreed that the delightful Jiji from Kiki's Delivery Service would be perfect.

So, would y'all like a tutorial on how to make bunting? 

You're in luck, because I'm in a tutorial-making mood!

What You'll Need

HeatNBond, UltaHold
fabric
thread
extra wide double fold bias tape, 1/2 package
sewing machine, rotary cutter or scissors, etc.

Instructions:

The finished squares will the 6" x 6", so the images need to fit inside this.
I printed out the letters in Curlz MT*, and since the images need to be flipped,
I turned the paper over and traced the letters on the back.

*I know some people find Curlz unbearably twee, but I like it.  Sue me. 
I also use Comic Sans on occasion, Haters!!


I put my traced letters under the HeatNBond ULTRAHOLD, and traced the letters onto it. Following the instructions I bonded the HeatNBond letters to the back of the black fabric.


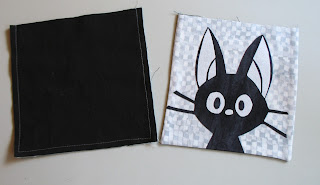
I did the same with a Jiji graphic I found, and then carefully cut them out.

The white is layered on the black, btw.  It was pretty easy to do.

Next, I cut five each 6 1/2" squares of the different gray fabrics
and the backing, black fabric.
(You need the extra 1/2" for the seam allowance.)


Tip!  Check the back side of fabrics. 
You can see that this busy fabric wouldn't work as well as its back side does.


I bonded all the letters and Jijis, making sure I liked the ending placement of the fabrics.
See?  It's busy-plain-busy-plain-busy for the gray squares.


I made sure I didn't go into the seam allowance, except for the bottom of Jiji.
If I made him "float" above the bottom, he would have ended up looking decapitated.
So I lined up the bottom of the image with the actual bottom of the raw edge.

To sew, I put the black and the decorated squares face to face, and sewed down the left, across the bottom, and up the right.  The TOP should be open.

I turned the blocks right side out, and ironed them.
I use a big fat knitting needle (size 15) to poke into the corners, to make them square.


I could make my own binding, but I'm lazy.  I buy this stuff, instead.
For this project, I only needed half the package.


The inside cardboard works very nicely for the next part of this project.  For longer strings, I use it as is, but for this project I trimmed it slightly down to 2" wide.

After ironing the binding (on medium heat -- it's polyester) I put a pin at the mid-way point.
I did the same with the middle letter, and eased it up between the two folds.


I then went to the right and the left, using my cardboard guide to pin the other letters.


Time to sew!  I like to use Sulky rayon thread and a serpentine stitch.
It's pretty easy to make the squares nice and straight up in the binding.

Finished!!


I think Jiji would approve.


Saturday, March 17, 2012

SIGH...

I made a freakin' AWESOME Gryffindor Snitch quilt to sell in my Etsy store.


Doesn't that whet your appetite to see the whole quilt?

Unfortunately...

...when it was time to photograph the quilt, I noticed something was a little off. 
I was having a hard time getting the quilt to "square up" in the camera viewfinder. 
Sure enough, when I held the top edge up against the bottom edge,
I realized that the bottom edge was a full FOUR INCHES shorter than the top edge.


ARGH!!!!

So, I guess I'm going to just keep this one.

And I'll be a heck of a lot more careful when I make another quilt with horizontal stripes.

Thursday, March 15, 2012

Woooooo!!!!

What's one of the best parts about working for the schools?


Spring Break!!

I believe I'll celebrate with a cookie.


Saturday, March 10, 2012

For The Simple Man, Who Likes Pretty, Dark-haired Women And Breakfast Food

As I promised in my last post, here's the tutorial for making a Pawnee Rangers hat.

Now, this isn't fancy, as befitting a man whose troop has only one guideline:


So it's TOTALLY DOABLE by even those who don't possess the crafty gene.

You will need:

a khaki-colored cap
ConTact paper
acrylic paint 
craft knife
small, spongy brush or stenciling "pounce"
 printer 

Instructions!

Print out "Pawnee Rangers". 


(Copy the image, and scale it to the size that fits your hat.)

FLIP IT OVER, and trace the back.


Tape down the paper, and tape a piece of ConTact paper,
with the peel-off paper on the TOP, over it.

As you can see, you should be able to read the blue words on the ConTact paper.

Now, carefully cut out the letters with your craft knife.


Don't worry about the insides of the letters like "A" and "P".  You'll fix those later.

After cutting out all the letters, peel off the backing paper
and stick the ConTact paper on your hat.


Remember all those inside bits for the "A" and "P"?  Don't bother saving the originals.  
Just cut out new bits from the leftover scrap ConTact paper.  It's easier,
especially if you first peel off the backing paper.

Once you have the ConTact paper all smoothed down, VERY CAREFULLY sponge the green acrylic paint on.  Don't brush it across the paper; dab it on with your spongy pounce.


All painted?
Then lift off the ConTact paper and behold the glory of your Pawnee Rangers hat!


Stick that bad boy on your head and you're ready to camp!


Bonus!

If you're interested in making the Pawnee Rangers patch, here's mine:


Instead of printing out the image like I did for the Pawnee Goddess patch -- I couldn't find a Ranger image -- I used Heat N Bond UltraHold and cut out the trees, fish, etc. and layered them like a collage.  I found this guy's handsewn patch to use as a reference.  I used a Pigma pen for the green outer words. (A Sharpie will bleed.)

I didn't have time to zig-zag the outside edge -- my husband decided at the last minute he wanted to join me in Costume Finery -- but it still looked pretty cool.  Don't you think?