Saturday, July 28, 2012

Zoidberg To The Rescue!

I made this excellent kitchen island last January...


...BUT it ended up becoming The Place Where Junk Mail Resides.


Another kitchen problem was my pages and pages of new recipe ideas
from Pinterest, the newspaper, the office staff room, etc.,
that just got buried under other stuff, never to be cooked.


(I think I see that Butterbeer recipe I've been meaning to try under that stack on the left.)

So I bought a wall pocket thingy from Office Depot...


...trimmed scrapbooking paper to fit the inside,
screwed it to the side of my island...


...and added Zoidberg to give me some handy advice.


Now the mail goes in two slots, the recipes in the other,
and when I'm making the grocery list,
I can just pull out a new recipe to add the ingredients to my list.


Anyone care to join me for dinner next week?


 I'm trying something new!


Tuesday, July 24, 2012

The Perils of Pinterest

Y'all are on Pinterest, right?

Because it's pretty much the most awesome thing to ever hit the internet!


If you're not on it, let me explain.

You know how you'd go over to your best friend's house as a kid,
 and you'd look at cool stuff around her mirror?

There would be pictures of cute boys...


... and funny cartoons...


... and inspirational sayings.


(I found the EXACT SAME weird poster of this saying that I had as a teen, 
but it was on someone's Flikr so I couldn't use the image.  Check it out, though!)

Well, Pinterest is like that, to the millionth degree!
It's about half the internet, putting things up around their virtual mirrors!

Anyhoo, one of the pins on Pinterest I put around my mirror, 
or "boards" as they're called, is this one:


Yeah, the writer behind the wildly popular dystopian trilogy
also wrote for the gentle Little Bear cartoon!

Interesting, huh?

Well another pinner begged to differ:

"Simple, she watched Battle royal. [sic]"

.
.
.
.
.

Ooooookay.

Now, I am not unaware of the controversy behind the similarities between Battle Royale 
and The Hunger Games.  But as I replied:

"People have been pitted against each other for others' amusement since forever. I will take Ms. Collins at her word that she got her idea after flipping between reality TV and the Iraq coverage, and listening to her father's accounts of Viet Nam."

No biggie, right?

But then!  The same poster wrote:

"Youre [sic] whats [sic] wrong with the world."

What?  What?!?
Not fandom, or Pinterest, or even the Wide, Wide World of Web, but
THE WOOOOOORLD.


Now I get hyperbole, but it's like I thought we were playing badminton...


and she decided heck, no, it's STEEL CAGE DEATH MATCH TIME.


Was my tone in my follow-up post a bit teacher-ish?
Yeah, I'll grant that.


I am a teacher, after all.

But what should I do now?
Just leave our interaction at that?

Well, as anyone who has spent more than twenty minutes interacting
via their computers knows,
while rule number ONE of the internet is
"Just because it's on the internet, it doesn't mean it's true,"


rule number TWO is
"Don't feed the trolls."

But this second rule makes me crabby.

I feel like it gives the power to the troll, not me.
I mean, they're a TROLL, right?
Big and powerful and scary!

So in situations like these, I instead turn to the ever-helpful and unflappable Miss Manners.


In her book Miss Manners' Guide to Excruciatingly Correct Behavior,
she said that when someone behaves completely outside the realm of good manners,
there is but one solution:
The Cut Direct.

According to Miss Manners, The Cut Direct means you don't argue with the cut-ee,
you don't talk to her,
you don't even acknowledge her existence.


"What?  Does someone speaketh to me?  I hear naught."

Although my behavior is exactly the same as a person who has chosen
 "to not feed the troll,"
somehow it is much easier for me not to get into a 
"No, you're the poopyface!!" argument with a poster
when I'm reminding myself that I'm practicing 
The Cut Direct.

And that's what I've done with Miss Bad Grammar Smartypants.

Sunday, July 22, 2012

Seriously, Big Bertha Will EFF YOU UP

I decided to let a zucchini just go.


I also decided to get my nerd on and document its growth.


And grow it did!


In just ten days it had doubled in size.

It grew so much I started to worry.


When would it stop?!


Had I forgotten the boundaries of science,
and begun to play GOD?!


Oh, nooooo!!!!
What have I done?!?


Run, everyone!


Run awaaaaay!!!


Wednesday, July 18, 2012

I Wish I Could Kiss This Woman

I hate basting my quilts.
Haaaaate it.  Even with spray-basting, it's tricky to do.

So before I spray-basted my three quilts today, 
I threw myself at the mercy of the Google gods.


(I dunno.  I pictured GoogleGod as nerdy-er.)

And, lo!  I was led to Chasing Cottons, where the delightful and helpful Kristie
had posted a tutorial, which included this super idea:

Use hand weights to hold the batting in place whilst the other layers
 are being centered and smoothed!


Sooo much easier and better!
I used to use both masking tape and  unwilling children,
and neither of them was satisfactory:
the tape kept popping up, and the kids kept trying to wander off.


Hey, you kids!  Get back here!  I still have two more quilts to do!


So head on over there to see her full tutorial;
if you're a quilter, you won't be sorry!

Tuesday, July 17, 2012

I'm a Free Woman!!

BadBabyQuilts, you just finished teaching summer school!
What are you going to do next?

I'm going to Disneyland sit at my computer
with a Trader Joe's burrito and a boba milk tea!


Wooooooo!!!!

Friday, July 13, 2012

My Desert Island Tomato

Now I realize that designating a tomato to be the
BEST TOMATO IN THE WOOOORLD!!!
is pretty presumptuous
especially since this is only my third year growing those tasty veggie-fruits,
and I haven't even grown more than two dozen varieties.

It's sorta like when I was in junior high, and declared Barry Manilow
the most awesome singer everrrrr....


 ....when I hadn't even HEARD Bruce Springsteen yet.


(Bruuuuuuuuce!!!)

But, hey, you can try to deny it, but if Copacabana is on when you're in the car?
You are going to sing the hell out of that song.


"At the COPA!  CopaCABANA!"

So just because I found something even more awesome,
(Bruuuuuuuce!!) 
it doesn't mean my unformed tastes were completely off base.

That said, in my limited experience, if I had to choose one tomato to grow?
It would be Sungold.


(Sungoooooold!)

Now maybe Sungolds are the Manilow of the tomato world.
(Sorry, Barry!  I really do love "Mandy"!)
But while they aren't literally as sweet as candy...


... they are delicious little tomato-y globes of sunshine.

And I would say that my success with these cherry tomatoes
despite my incompetence inexperience is a huge vote in their favor.

Even though I used cruddy soil,
and swung between overwatering and underwatering the potted plant,
and never fertilized at all,
I still managed to harvest enough of these delicious golden globes to top my salads
throughout last summer.


(That's not me.  I didn't have a photo of me and my Sungold-topped salads,
so I thought I'd link to one of those stock photos of  Smiling Women With Salads.)

And here's something else about the Sungold!
Last year's plant went around the horn, and was still producing!

When I was planting new seedlings this spring, it was still alive, although pretty scraggly.
I still hadn't fertilized it AT ALL, and was watering it in the most desultory way.


I was getting ready to tip it out of the pot,
when the Sweet Man asked what I was going to do.

I explained I was going to "shovel prune" it, because, y'know, it was time for a new plant.

Well, the Sweet Man practically flung himself between me and the plant,
like he was Fern, I was Mr. Arable, and the Sungold was tiny Wilbur the pig.


("Mama, where's Dammit Minnie going with that gardening trowel?")

"But it still has tomatoes on it!" he protested, and yes, it did.


(Extreme close-up!)

"So why do you have to get rid of it?" he asked, and I'll be damned if I had a good answer.

"It's an annual?  I think?" I told him.
But a quick Google search said that nope, tomatoes are actually tender perennials.
And that means that in sunny SoCal...


... I should be able to overwinter tomatoes.

So I gave it a haircut...


... replaced the soil with good stuff, and planted it deep.

And what do you know?

It worked!


I've already harvested a nice handful of sweet, sweet Sungolds.

So, yeah, I'm a relative amateur with tomato gardening,
but when I recommend a tomato to fellow newbie?
I tell 'em to go for the 'Gold try Sungold. 


Tuesday, July 3, 2012

Begone, Tacky Topsy-Turvy Planters!

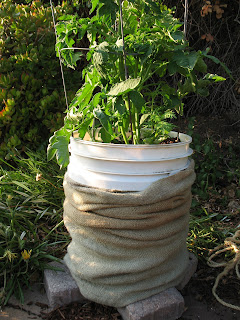
Back in this entry I gave a peek of my cool-looking burlap-covered buckets.

Now whooooooo's ready for a tutorial?!

It started out when I saw this pin on Pinterest:


Here's the original post, BUT
...it's in another language.  One with umlauts.
So even if there was a tutorial there, I couldn't read it.

SO.

I kept looking at at the photo, trying to figure out the dimensions of the "bag" these
buckets were in,  when I had a revelation:

it's not a bag at all!  It's a TUBE!

Which means that making one is super-easy, even if you don't sew a bit.

On

to

the 

tutorial.

To start with, you'll need a bucket.  If you don't have an old detergent bucket,
places like Home Depot sell five gallon buckets for about three dollars.


I also heard that doughnut shops get their shortening
 or something in big buckets,
and will give you their empties.  
Let me know if that's true!


(I'm only here for the buckets.  Honest.)

I cut off the handles with a wire cutter; 
they wouldn't be accessible, anyway.


Don't forget to drill some holes in the bottom!


For your supplies,
you'll need to buy some rope or twine.  I got 1/4" sisal rope.


If you don't have a sewing machine, buy a tapestry needle
I got a size "13".

To figure out how much burlap to buy,
measure around the widest part, and add about three inches.
 I think my buckets were about 39" around,
 so I needed  at least 42" of  40" wide burlap.

If you don't have a measuring tape, just use a piece of yarn
or hold the fabric around and mark it with your pinched fingers!
That's what I did the first time.

Sewing info!
Fabric usually comes in widths of 40" or 60".
  You'll be using the 40" wide.

Get a little extra for wiggle room, though; 
a yard and a quarter would be a good amount.

You might want to cut the fabric a little longer at first, 
to make sure it fits right.
It's a lot easier to tighten up the tube
than it is to pick out the seam and make the tube bigger.

 You want it to be snug, but not too tight.

Now you're ready to go!

To make a nice edge to cut/sew, pull a thread out of the burlap
ACROSS the width of the burlap...


...then cut along that empty space. 
 Repeat the thread-pulling/cutting at your desired width.


Now fold the rectangle in half so those CUT EDGES are together.

^^^^^ This is the cut edges, together. ^^^^^
You're going to sew along here.

If you have a sewing machine, go to town!
If not, it is SUPER EASY to just sew with your big fat tapestry needle.

What should you use for thread?
Why, you can just use that thread you pulled out for your cutting line!
If it broke, just pull another one off the edge.
Sew about a half inch away from the edge. 
(I used a bigger seam here; you don't need to.)


Once you've sewn along that edge, 
you're going to FOLD the tube down on itself,
so the seamed part is on the inside.


This is how it will look on the top.


Now you have a tube, a couple inches bigger around than your bucket,
and several inches longer.
The top of the tube is the folded edge,
and the bottom is the two other "loose" edges.


Take that tube to your bucket, 
and pull it up like you're pulling on a pair of comfy jeans.
Have the nice FOLDED edge on the BOTTOM.


Once the tube is pulled up,
 roll it down a few times for a decorative folded edge.


Break out your rope/twine...


...wrap it around a couple of times, and tie a bow.


As the Frenchies say,

VOILA!


A couple of tips:
the first time I did this, I gathered the bottom and put it underneath.


AAAAIIIIIEEEE!!!!


The water wicked up and made the burlap all moldy.  Yuck!

So don't do that.  It looks perfectly fine to just have the edge of the tube even with the bottom of the bucket.

Also, put that bucket up on bricks or something!  It helps with drainage,
and will keep the moldy thing from happening.

Okay.

ALL DONE,
I thought.

But...
you know how when you fix up one area of your house...


the rest starts to look extra-shabby in comparison?


Yeah, that's how I started to feel about those icky,
 faded-green Topsy-Turvy planters.


Anyhoo, in a flash of BRILLIANCE,
I realized I could do the same burlap thing with them!!

The only thing different is I used less burlap.


It was a bit trickier with the Topsy-Turvy
I was using in the way it was actually designed to be used,
since I had to pull it over the top where it was hanging from a hook.

But I asked the Sweet Man to hold it up,
and I slipped the tube over the top.


I did gather the bottom edge on the Topsy-Turvy
that had the tomato plant growing out of the bottom;
the green lid thingy meant that I had to make the tube pretty big.
It looked way too baggy before I gathered.


Lookin' good, yeah?