Monday, April 30, 2012

AVERT YOUR EYES, ALL WHO ARE SQUEAMISH

I moved a pot, and what did I find?

Sweet mama jamma, a slug as big as my thumb!


You don't believe how big it was?

JUST LOOK!


Slug shown with a large spool for scale, and a leafy offering --
an offering given in the hopes it
wouldn't ooze
up my arm
to
my 
HEAD.


('Sup, Fry?  I miss you!)

And -- this is the worst part -- you can actually see INSIDE the slug!


AUGH!!

What am I SEEING inside that slug?
Is it its heart?
Its sluggy BRAIN?!?

GROOOOOSSS!!


Sunday, April 29, 2012

Square, But Not

As I detailed in this post, I am an enthusiastic, but not particularly skilled gardener.
Here, for example, is a pot of my tomatoes from last year:


So freakin' scrawny, right?

THIS YEAR, I'm trying to learn from the Tomato Masters.


So I turned to Mel Bartholomew and his Square Foot Gardening book,
because Mel has evidently been gardening since the 
FIRST time there were only eight planets.


(Shout-out to Neil deGrasse Tyson, the astrophysicist who helped downgrade Pluto!)

Oh, and here's a picture of the Square Foot Gardening guy:


(Is there a meeting or something where all these gardening guys decide
that they'll only dress in denim shirts?)

Although I wasn't planning on going full-on Square Foot Gardening,
I decided to follow Mel's recipe for soil for raised beds.
It's 

1/3 compost
1/3 peat
1/3 vermiculite.

Easy-peasy, lemon-squeezy, right?

WRONG.

Because Mel says the if the compost isn't homemade
it should be made from FIVE different sources.
And that makes for some tricky math, because, some bags are one cubic foot?
And some are one and a half?
And I'm supposed to start with FIVE bags?

What to do?

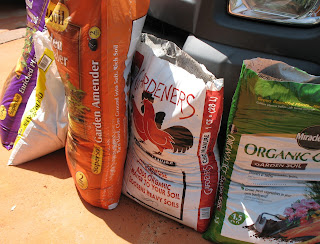
Well, first of all, I started out with my bags of compost:


I couldn't find them all at one place, btw.  I had to go to both Home Depot and Lowes.
Maybe a nursery would have a lot more different composts?  I'll check next time.

I added a tub of each compost to my nice green wheelbarrow.


I mixed them up with my little shovel...


... and then drew a line with a Sharpie at the level of the finished mixture.


I dumped the compost in my smaller raised bed,
and filled the wheelbarrow up to the line first with my peat,
and then with my vermiculite.

I mixed them together, and had my desired 1/3 - 1/3 -1/3 mixture.  I repeated several times, until the bed was full.

BUT it was kinda a pain.  And it took a while.

I was getting ready to start on my bigger raised bed, when I realized, duh,
that to make the whole process easier on myself

ALL I HAD TO DO WAS WORK WITH SIXES.

If I got THREE 2 cubic feet bags of vermiculite, and
THREE 2 cubic feet bags of peat,
I just had to make sure the compost added up to about SIX cubic feet total!

This wasn't super-hard, since two bags of 1 1/2 cubic feet and
three bags of 1 cubic feet equals 6 cubic feet.  

(I fudged a little.  I figured 1/2 cubic feet either way wouldn't be a deal breaker.)

Also, I realized my raised bed made a perfect mixing bowl for my poopy, peaty soil!


So I would dump ONE 2 cubic feet bag of peat,
ONE 2 cubic feet bag of vermiculite,
and 1/3 bag of each of the composts into the raised bed,
and mix it first with the rake and then with my hands.

I found it oddly satisfying to mix and squish all the balls of steer poo.


(I thought you'd rather see the candy than the poo.)

The reason I didn't dump everything in at once is that I thought there might
be too much to fit in the bed.  Also, it was easier to mix a smaller amount at a time.
Mel recommends dumping everything on a tarp and mixing it by having
two people grab the opposite sides and lift and mix; since the Sweet Man was still recovering from the flu I didn't want to press him into service.

Using the bed as a big ole mixing bowl had another advantage:  I would mix up the mixture,
and then fill up my smaller pots.


After a very long, very sweaty day, I had two beds and three big pots
all filled with top-notch soil.


But what are those green discs that have landed all over the beds?
Stay tuned to find out!


Saturday, April 28, 2012

Gettin' Drunk On Garden Mulch

Back in this post, I said I'd 'splain what the black fabric-y stuff was around my raised bed.


It's garden fabric, and it's designed to smother and keep out weeds.


It's totally worth the money;
last year I took the advice of an email forward and tried putting down newspaper, instead.

BIG MISTAKE.

The newspaper broke down, and the weeds sprung up.  I'm not obsessive
about weeds, but the dang things came up under the newspaper,
and made big ole bumps all over the area between the pots.

So don't cheap out!  Use this stuff, use A LOT of it, and overlap it like crazy.
 I didn't overlap it that much when I used it in another area, 
and there was a neat line of weeds all along the gap.

Now, what to cover it with?

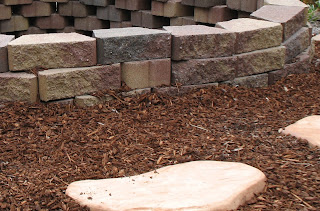
For the path between the beds and pots, I put down shredded bark:


It looks nice, right?
But holy moly, it's as full of splinters as a splintery thing can be.
When I was working with it, I finally brought my reading glasses
and a pair of tweezers outside to pull out all the tiny, tiny irritating splinters.


I was planning on sucking it up and using the shredded bark in the beds anyway,
but then I listened to You Bet Your Garden with Mike McGrath on public radio.


(My Sweet Man on public radio:  "They all sound like they're wearing sweaters.")

Now Mr. McGrath started on about mulch, and pretty much said
a gardener might as well pour rat poison over her garden if she used shredded bark.

Evidently it's bad, BAD for the garden!

So what should I use?

I went sleuthing around the internets, and found that Mr. McGrath recommended

HOMEMADE COMPOST

(which I didn't have enough of)

SHREDDED FALL LEAVES

(it's spring, and I definitely don't have those)

or 

COCOA MULCH!


Omigosh!  Perfect!  I love, love the smell of the stuff.
In fact, the two bags I bought ended up sitting in my car for a week while I was sick,
and when I got back into the car it smelled exactly like chocolate wine.


Also, it looks very nice around the plants...


...AND, it left my hands with nary a splinter.


WINNER, WINNER,
CHICKEN DINNER!


Sunday, April 22, 2012

Newspaper Pots. AGAIN.

SIGH...


AGAIN, there's funk and fuzz on my newspaper pots and little paper cups,
despite my racks and  drainage holes .

Maybe I need a little fan going, for air circulation?
Even less watering?
More distance in between them, so crud can't pass from one to another so easily?

WHATEVER.

I'm going to just shove what I already have in the ground, and hope for the best.


The crazy thing is, I have a bunch of the newspaper pots I thought were too moldy to save
that I had just left on the patio the last couple of weeks.
It rained super-hard one day, and it's been really hot the last couple days, but 
look at them:


What?!?  Does some benign neglect actually HELP newspaper pots?

Next year, I'll try some new things.  I'm not giving up on paper yet.
But I'm not going to start anything else from scratch at this point, 
since it's time for this stuff to get growing outside!

Saturday, April 21, 2012

Altoid Tins... Great Invention, or GREATEST Invention?

Does anyone else have a meeeellion Altoid tins?

I do, and after seeing this boss Pin on Pinterest about making art tins --


-- I decided to make some of my own.

But I wanted to do something a wee different.

It was after finding out that ConTact brand paper made
CHALKBOARD!!! sticky paper that I decided to add that twist.

So I bought out Joann's colored chalk...


... made some wee blank coloring books...


... filled the tins with crayons, and placed the ConTact paper on the lid and bottom.


I sewed a little sleeve (which doubles as a chalk eraser) for a single piece of white chalk,
and they fit nicely inside.

I also flipped over the tin and drew a grid for tic-tac-toe, using a silver Sharpie
so it wouldn't have to be re-drawn every time.


But... where's the colored chalk?

Sigh...

I didn't realize until after reading a very helpful review on Amazon
that the chalkboard had to be CURED by rubbing chalk all over it and erasing it,
so it would "take" chalk.

I thought the colored chalk wasn't working, and did the whole crayon thing, instead.
I only used the lone white chalk that DID seem to be working.

To be fair to me, even after curing, it doesn't seem like colored chalk
shows up as well as white.  So maybe, if you're planning a craft with the stuff, 
I can send you a square of it to play around with BEFORE you invest in a whole roll.


(Seriously, let me know your address.  I'll send you a bit of this.)

Anyhoo!  It still looks cool, right?
I have one I carry around at school, and I use it with my student
when he's having a hard time waiting during an assembly or fire drill.

I also sold a few at a craft fair; wouldn't they make a nice little gift from grandma or auntie,
with a crisp fiver slipped in with the chalk and coloring book?


Sunday, April 15, 2012

Newspaper Pots, Take Two

As I detailed in this post, my newspaper pots got all funky.


So last week, I transplanted the little seedlings into new newspaper pots
and also little paper cups.

How do they look this week?


Pretty good!


The majority of them survived the transplanting, and new seedlings
are popping up where I sowed new seeds.

Besides being more careful with my watering,
I also did something else to ensure the bottom of my newspaper pots
wouldn't get too wet:


I took one of my cookie cooling racks and put it in the bottom of the
cardboard tray.  It really seems to help!

Friday, April 13, 2012

I'm Practically A Founding Father. Or Mother.

Today I had jury duty.

Booooooo, right?

Nope, it was awesome!

I showed up at 8 am for my one day.  The room was warm and spacious, with comfy chairs
and a panoramic window showing us the storm right outside.

First, a judge showed up in his suit and red bow tie:


Nooooo... not that guy!  A grown-up judge guy in a red bow tie!

He gave a short speech that simultaneously reassured us we were in for an easy day,
and praised us for being Super-Patriots who should be proud of 
 doing our civic duty.

THANKS, JUDGE GUY!

Next, a red-haired woman went to the podium to give us an orientation speech.


 Well, she didn't have Joan's figure, but she certainly had her sass.

We laughed as she gave us the needed info in a sly, snarky way, and
we also thought a collective "Buuuuuuurn..." when she coolly asked the owner
of a ringing cell phone, "Do you need to get that?"
(Joan would have been proud.) 

What next?

VACATION BEACH TIME!


Well, not literally.  But we just needed to hang close, so I busted out my newspaper 
and book, and spent a pleasant morning reading, reading, reading, which I usually only get to do on a weekday morning when I'm on vacation, sprawled on a beach blanket.

And how much time did we get for our lunch break?

NINETY FULL MINUTES!


Ooh la la, am I in France?

I get a scant 25 minutes at work, sometimes less.

After having time to not only get a Chipotle salad bowl
but also go for a nice long walk in the rain, I headed back for more reading
and a bit of check balancing. 

Done with my chore, I decided to reward myself with a trip to the vending machine:


I don't know the last time I had one of these.
They were, as I remembered, DELICIOUS.

By now it was 3 pm.  

Joan-Adjacent asked us all to return to the room, where we nervously waited to 
be called to a panel.  (Sort of a preliminary for being called on a case.)

But, no! 


We
were
FREEEEEE!!!!


We tossed our badges in the baskets,
grabbed our "Get Out Of Jury Duty For One Year" paperwork
and we were GONE!!

All in all, it was a fine way to spend Friday the 13th.

Thursday, April 12, 2012

Good Luck Stormin' The (Plant) Castle!

Since my front yard has the best light, 
last year I took over the strip beside the driveway for my fledgling veggie garden.

It did... only okay... but despite my failures I had been bit by the veggie gardening bug,
and I was determined to expand my garden this year.

Last year, I had just plunked a bunch of big pots on top of the grass,


and then later tried to smother the grass with landscape fabric and bark.


Not terrible, but kinda messy looking, right?  And not in a charming way.

So THIS summer, I decided to replace some of those pots with a nice raised bed.
After a whole lot of poking around Pinterest, I decided on using stone retaining blocks.
They don't need any mortar, and the lip at the back keeps them in place.


I made a rough estimate of how many I needed, and then took my envelope of Etsy profits
over to Home Depot.

A worker loaded up a hundred blocks on a pallet, and brought them to my Element.
I knelt in the back, and two employees helped me load.
While I was doing this, a guy came up to ask one of the employees a question about his gardenias; I continued loading until he squinted at me and asked,

"How many of those are you planning to put in the back, there?"

"A hundred."

"Well, I gotta tell you, I'm in construction, and I wouldn't put that many
in the back of my truck."

(At this point, I started listening with both my earholes, since truck commercials have convinced me that you could load the Washington Monument in the back with no problem.)


And then he went on using scary words like "axel" and "bow" and "snap,"
and I decided to stop right there at 75 blocks and come back for the other 25 later.

I got in my car and putt-putt-putted away in the parking lot at about four miles an hour,
then slowly circled back when I became convinced I was hearing the sound
of my car breaking.

The two employees were still standing there, watching my turtle-like circuit.
They helped me unload 25 of the blocks we just loaded, and I  headed home with
only 50 weighing down the back of my car. 
I returned later for the other 50, and called it a day.


DAY TWO:


Since I'm a crazy person, I decided it was NO PROBLEM to build my first
raised retaining wall bed on a sloping site:


And it didn't just slope east to west; it also sloped north to south.
But I'm stubborn  determined, so I laid out a rope in the design I wanted...


And then laid the blocks around the rope.


Now it was the TRICKY PART.


I got the level and tried to make the first block level,
and then the SECOND block level with it.


(Btw, my favorite "crazy" metaphor?  My dad calling someone "half-bubble off plumb.")


When it came to the second and third block, I had to dig a hole deeper and deeper so that the blocks would be level with the preceding block.
I scratched away with my gardening trowel, and after waaaaay too much time,
realized I needed some advice.


Off to the Internets!


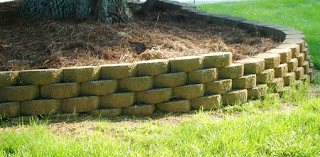
I found these instructions, and this image:


Isn't it beautiful?  SPOILER ALERT:  Mine's not going to look like that.


But I got some info, and realized I was supposed to be putting gravel
all along the bottom (a step I skipped)
and digging one long trench (a step that made my construction easier.)


After getting some blocks in line, I realized what the trick to this whole slope was going to be:
digging the trench progressively deeper, using the level to keep things well, level,
until the block was completely level with the ground.
THEN, I needed to put gravel next to the ground-level block,


and place a block ON TOP of the last block and the gravel.
You can probably see it better here:


That bottom block on the right should have been over more, shouldn't it? 
So its left edge was in the middle of the bottom right block.


It's not, for a reason, which I'll write about later on.


Anyhoo, I just kept stacking and digging, digging and stacking, until I had the bottom row.


But, uh oh!  I couldn't get the bottom edges to come out just right.
I was coming to the bottom left corner both clockwise and counter-clockwise,
and two blocks were too few to fill the gap, and three blocks were too many.

So I got creative, and just flipped one of the blocks around:


(You're probably wondering what that black fabric-y stuff is. 
I'll write about it in my next entry.)


I kept stacking and stacking, and flipping around blocks as needed.


But soon I realized a Math Truth:


Since each row is set back about an inch,
each row is going to be a little smaller.


Which meant each row needed a leeetle less blocks than the one above it.
And just flipping around a block wouldn't work every time.
Also, since each row is set back,
turning corners would get my carefully aligned blocks off a little.


A search of the Internets told me that carefully chiseling an inch or so
off EACH BLOCK for each new row would solve this problem.


Uh, NO.


Not going to do that.
Instead, I just settled for a less-than-perfect retaining wall bed.


It still looked pretty good, no?
Show us your better side, raised bed!


I figure I'll just plant stuff that spills along the edges, so the little dips won't be so obvious.