Since my front yard has the best light,
last year I took over the strip beside the driveway for my fledgling veggie garden.
and I was determined to expand my garden this year.
Last year, I had just plunked a bunch of big pots on top of the grass,

and then later tried to smother the grass with landscape fabric and bark.

Not terrible, but kinda messy looking, right? And not in a charming way.
So THIS summer, I decided to replace some of those pots with a nice raised bed.
After a whole lot of poking around Pinterest, I decided on using stone retaining blocks.
They don't need any mortar, and the lip at the back keeps them in place.
They don't need any mortar, and the lip at the back keeps them in place.

I made a rough estimate of how many I needed, and then took my envelope of Etsy profits
over to Home Depot.
A worker loaded up a hundred blocks on a pallet, and brought them to my Element.
I knelt in the back, and two employees helped me load.
While I was doing this, a guy came up to ask one of the employees a question about his gardenias; I continued loading until he squinted at me and asked,
"How many of those are you planning to put in the back, there?"
"How many of those are you planning to put in the back, there?"
"A hundred."
"Well, I gotta tell you, I'm in construction, and I wouldn't put that many
in the back of my truck."
(At this point, I started listening with both my earholes, since truck commercials have convinced me that you could load the Washington Monument in the back with no problem.)

And then he went on using scary words like "axel" and "bow" and "snap,"
and I decided to stop right there at 75 blocks and come back for the other 25 later.
I got in my car and putt-putt-putted away in the parking lot at about four miles an hour,
then slowly circled back when I became convinced I was hearing the sound
of my car breaking.
The two employees were still standing there, watching my turtle-like circuit.
They helped me unload 25 of the blocks we just loaded, and I headed home with
only 50 weighing down the back of my car.
I returned later for the other 50, and called it a day.
DAY TWO:
Since I'm a crazy person, I decided it was NO PROBLEM to build my first
only 50 weighing down the back of my car.
I returned later for the other 50, and called it a day.
DAY TWO:
Since I'm a crazy person, I decided it was NO PROBLEM to build my first
raised retaining wall bed on a sloping site:

And it didn't just slope east to west; it also sloped north to south.
But I'mstubborn determined, so I laid out a rope in the design I wanted...

And then laid the blocks around the rope.

Now it was the TRICKY PART.
I got the level and tried to make the first block level,
and then the SECOND block level with it.

(Btw, my favorite "crazy" metaphor? My dad calling someone "half-bubble off plumb.")
When it came to the second and third block, I had to dig a hole deeper and deeper so that the blocks would be level with the preceding block.
I scratched away with my gardening trowel, and after waaaaay too much time,
realized I needed some advice.
Off to the Internets!
I found these instructions, and this image:
Isn't it beautiful? SPOILER ALERT: Mine's not going to look like that.
But I got some info, and realized I was supposed to be putting gravel
all along the bottom (a step I skipped)
and digging one long trench (a step that made my construction easier.)

After getting some blocks in line, I realized what the trick to this whole slope was going to be:
digging the trench progressively deeper, using the level to keep things well, level,
until the block was completely level with the ground.
THEN, I needed to put gravel next to the ground-level block,

and place a block ON TOP of the last block and the gravel.
You can probably see it better here:

That bottom block on the right should have been over more, shouldn't it?
So its left edge was in the middle of the bottom right block.
It's not, for a reason, which I'll write about later on.
Anyhoo, I just kept stacking and digging, digging and stacking, until I had the bottom row.

(You're probably wondering what that black fabric-y stuff is.
I'll write about it in my next entry.)
I kept stacking and stacking, and flipping around blocks as needed.

But soon I realized a Math Truth:
Since each row is set back about an inch,
each row is going to be a little smaller.
Which meant each row needed a leeetle less blocks than the one above it.
And just flipping around a block wouldn't work every time.
Also, since each row is set back,
turning corners would get my carefully aligned blocks off a little.
A search of the Internets told me that carefully chiseling an inch or so
off EACH BLOCK for each new row would solve this problem.
Uh, NO.
Not going to do that.
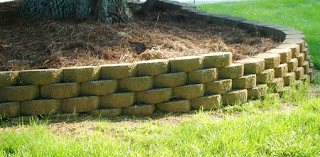
Instead, I just settled for a less-than-perfect retaining wall bed.

It still looked pretty good, no?
Show us your better side, raised bed!

I figure I'll just plant stuff that spills along the edges, so the little dips won't be so obvious.

And it didn't just slope east to west; it also sloped north to south.
But I'm

And then laid the blocks around the rope.

Now it was the TRICKY PART.
I got the level and tried to make the first block level,
and then the SECOND block level with it.

(Btw, my favorite "crazy" metaphor? My dad calling someone "half-bubble off plumb.")
When it came to the second and third block, I had to dig a hole deeper and deeper so that the blocks would be level with the preceding block.
I scratched away with my gardening trowel, and after waaaaay too much time,
realized I needed some advice.
Off to the Internets!
I found these instructions, and this image:

Isn't it beautiful? SPOILER ALERT: Mine's not going to look like that.
But I got some info, and realized I was supposed to be putting gravel
all along the bottom (a step I skipped)
and digging one long trench (a step that made my construction easier.)

After getting some blocks in line, I realized what the trick to this whole slope was going to be:
digging the trench progressively deeper, using the level to keep things well, level,
until the block was completely level with the ground.
THEN, I needed to put gravel next to the ground-level block,

and place a block ON TOP of the last block and the gravel.
You can probably see it better here:

That bottom block on the right should have been over more, shouldn't it?
So its left edge was in the middle of the bottom right block.
It's not, for a reason, which I'll write about later on.
Anyhoo, I just kept stacking and digging, digging and stacking, until I had the bottom row.
But, uh oh! I couldn't get the bottom edges to come out just right.
I was coming to the bottom left corner both clockwise and counter-clockwise,
and two blocks were too few to fill the gap, and three blocks were too many.
So I got creative, and just flipped one of the blocks around:

I'll write about it in my next entry.)
I kept stacking and stacking, and flipping around blocks as needed.

But soon I realized a Math Truth:
Since each row is set back about an inch,
each row is going to be a little smaller.
Which meant each row needed a leeetle less blocks than the one above it.
And just flipping around a block wouldn't work every time.
Also, since each row is set back,
turning corners would get my carefully aligned blocks off a little.
A search of the Internets told me that carefully chiseling an inch or so
off EACH BLOCK for each new row would solve this problem.
Uh, NO.
Not going to do that.
Instead, I just settled for a less-than-perfect retaining wall bed.

It still looked pretty good, no?
Show us your better side, raised bed!

I figure I'll just plant stuff that spills along the edges, so the little dips won't be so obvious.
I like it. Thanks for the step by step!
ReplyDeleteYou're welcome!
Delete